Making Your Own Free-Spin Pawl
Below is an edited version of data from the Ruger-Smithing portion of the Ruger Forum.
Note: the pawl is a custom-fit part, so if you mess up your existing part, you
will either
have to try to make a new part fit your gun or have a gunsmith do it.
This is one of those modifications that Gunsmiths like - because you very
likely may have to bring the gun to them after you work on it. So keep this in
mind. It is not for everyone.
I have not personnal done this modification but I recommend that you order a
new pawl, fit is as described below. Then
modify the new part for the free-spin function. Much of the following is
quoted from input from other pards that have done this modification. (So when
it says "I", it refers to the person posting the info.)
If you are unable to get the new pawl to work as a free spin, you can reinstall
the old pawl and you still have a function revolver.
| Warning and Disclaimer! ALWAYS wear high-quality safety eyeglasses when installing or fitting any parts, particularly springs, to prevent injury. Always wear eye and ear protection while shooting. Never discharge a weapon in an unsafe manner or direction. DO NOT use ammunition exceeding manufacturer's recommended specifications or pressures suitable to your firearm. The use of an aftermarket product in your firearm, such as this carrier block, may limit or void the manufacturer's warranty. In all circumstances, ensure the firearm is unloaded before attempting any of the following procedures. Check and recheck the magazine and action to ensure no cartridges remain in the rifle. It is a good practice not to have ammunition in the same room as the firearm you are cleaning, repairing, adjusting or dry firing. Failure to follow strict safety practices in the assembly, test and/or operation of your firearm may result in accidental discharge, firearm damage, serious bodily injury and/or death. ALWAYS be certain that the firearm is functioning properly before use. These procedures assume that the user has basic mechanical comprehension and skills. If you are in any doubt as to: 1) your abilities, 2) the steps to be followed, or 3) the safety or function of the firearm during or after installation or during testing and use, DO NOT PROCEED with further assembly, disassembly or use. STOP! Take the firearm to a qualified gunsmith for inspection. We make no claim as to the completeness of these procedures, their accuracy or their suitability for your particular firearm or your intended use of said firearm.
|
After Market Pawls I called Ruger today. Mike said that all pawls are factory fit. They only have
one pawl for the large frame. I ordered two extra and some other screws while I
had them on the phone. You have to match the replacement pawl to the factory
then make it free spin. (Think of the top portion of the pawl as two legs or
better yet, two "steps") The very bottom of the pawl is probably ok BUT the top
and possibly the bottom leg or "step" may need to be shorted slightly. I know
it's a pain in the a.. but file
a little at a time and
trial fit. You need to measure your FACTORY pawl and make the replacement like it. Both
top and bottom leg. Don't mess with the bottom of the pawl. You can do this.
You could make the factory pawl a free spin and end your pain and still file
the replacements. I don't think you could ever wear one out. With the book and
the part it's easy to understand. Go slow and it works. Stay with it you'll get
it. I just finished fitting a replacement pawl to my vaquero 45 colt. I got the
pawl from Ruger along with a bag of screws and springs. The pawl was $3.25 from
Ruger. Brownells wants $4.76. I knew I had to shorten the pawl but found it hard to measure. Below, Ruffbird
said he
had a problem with cocking and removed from 5 to 10 thousandths off the top
leg. I took about 7
off the TOP leg and polished the hell out of the bottom leg. It worked great. I
then did the free spin routine and everything works fine. I have less slack
(over travel?) fully cocked than I did with the factory pawl. I put a bisley
hammer on this gun some time ago. Anyway I'm going to make one for my bisley
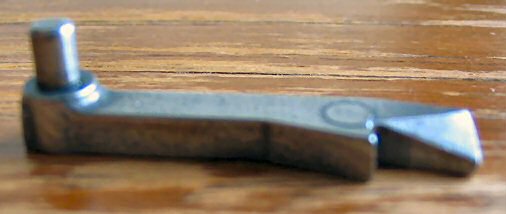
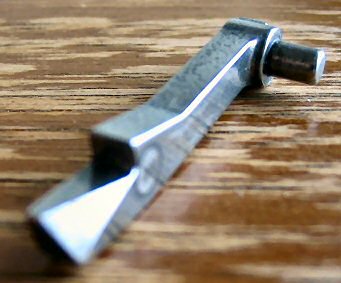
and my SBH. I'm thinking each gun has to be fitted. Making a Free-Spin Pawl If you have a magnifying glass, this will help greatly in doing this tiny job. It takes longer to take the gun apart than to actually alter the pawl... A few pic`s to show the alteration: this is the pawl before...(factory)
Eric
Following instructions I got from members of the Ruger forum, I altered the
factory "pawl" to allow the cylinder to spin backwards. No more click, click,
click.
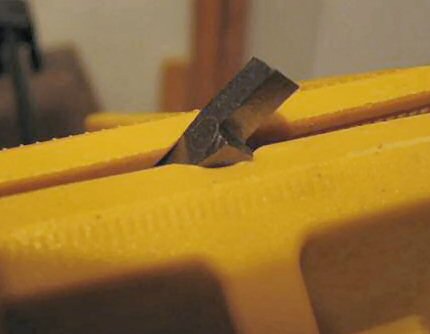
I don't have a dremel, so I disassembled the gun, & clamped the pawl in a vise
to file it. Started with a flat 8" file, & hollowed the flat with a small
jewelers, round/flat file, then I lightly stoned the surfaces.
Go slow, checking often, & you can do it!
This is done on the "boss" side of the pawl.
DON`T file it to a point; file to
within 1/16" on the other (front) corner.
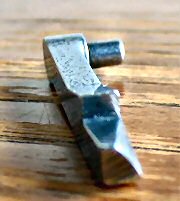
This is it after the alteration....
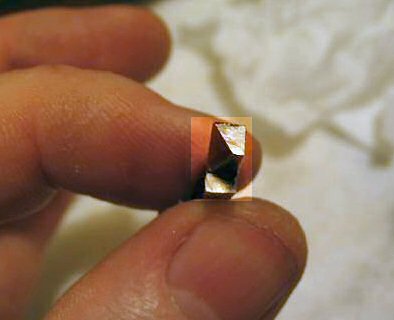
Side view....
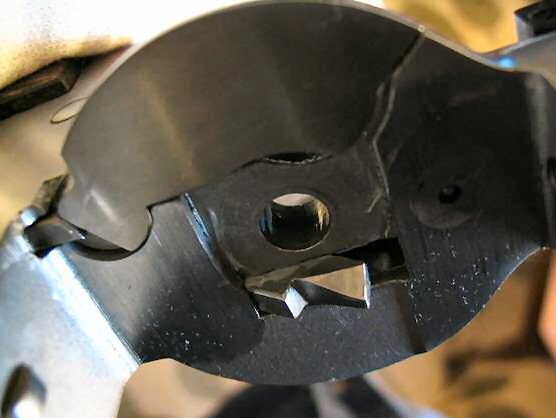
Additional Views:
Installed in the frame with the hammer cocked back, & the cylinder pawl at its highest travel in the frame, it will look like this....
RUFFBIRD, (who can do it, anybody can)
Questions:
Is the pawl hardened & will this modification cause problems later. It seems like the lower tooth does most of the work anyway.
While I have the pawl out, should I stone the flat area under the lower tooth that rides on the frame? It seems like that would smooth up cocking.
If you make this modification to your gun, you will control where the charge hole lines up to load/unload. can move the cylinder counter-clock-wise, or clock-wise as you need to load/unload.
Reply
The "pawl" was very easy to file, so I wouldn't think it is hardened. as far as
stoning the pawl, I used an extra-fine stone from a LANSKY sharpening set to
fine tune it. Oil the stone & lie the part flat, & with gentle pressure slide
it back & forth. All you want to do is make it smooth, not changing angles or
dimensions.
Do all 4 sides of it. 7 or 8 strokes back & forth should do it. Look very close with a magnifying glass, before you start, & you can see where the part makes contact. check it again after stoning & you will see the shinny sections, these were the high/rough spots.
Just a word of caution, IF you stone the trigger & hammer parts, DO NOT change any angles, or use stones coarser than extra fine, on the contact points. if you have any doubt leave these alone. you could make the gun very dangerous. the hammer could slip off the trigger & fire a round, when not expecting it!
hope this answers your questions.....
Additional comments from ruffbird:
I have done 10 Rugers now (using the factory fit pawl), for this modification &
pleased how each turned out.
I purchased a few new Rugers last year that would lock-up, when going to
"cock" the gun slowly. as you pull the hammer back, the cylinder-latch wasn't
dropping completely out of the cylinder-notch, before the cylinder started
turning.
To remedy this, while the cylinder-pawl was out, to do the free-spin modification, file away about 5-10 thousandths off the very top tooth, (keeping the same geometry) effectively shortening the pawl. this changes the timing, to allow the cylinder latch to drop out far enough, before (almost the same time) the cylinder starts to rotate.
ruffbird.
For the original posts see:
http://www.rugerforum.com/ubb/Forum12/HTML/000948.html and
http://www.rugerforum.com/ubb/Forum12/HTML/001044.html
Return to Irons Page Back to Cowboy
Updated 6/29/2005